Difference between revisions of "Collectors Club"
Jump to navigation
Jump to search

m |
m |
||
| Line 27: | Line 27: | ||
image:EagleM14.jpg|<center>#86:<br>Proudfoot at Hobbiton | image:EagleM14.jpg|<center>#86:<br>Proudfoot at Hobbiton | ||
image:EagleM15.jpg|<center>#94:<br>Pippin with wounded Merry | image:EagleM15.jpg|<center>#94:<br>Pippin with wounded Merry | ||
| − | image: | + | image:EagleM95.jpg|<center>#95:<br>Gollum in the Misty Mountains caves |
| − | image: | + | image:EagleM98.jpg|<center>#98:<br>Frodo & Sam dressed as orcs |
image:EagleM18.jpg|<center>#103:<br>Gollum at Mount Doom | image:EagleM18.jpg|<center>#103:<br>Gollum at Mount Doom | ||
image:EagleM19.jpg|<center>#104:<br>Gimli at Lothlorien | image:EagleM19.jpg|<center>#104:<br>Gimli at Lothlorien | ||
| Line 36: | Line 36: | ||
image:EagleM25.jpg|<center>#121:<br>Dwarf Lord at Noldorin Forge | image:EagleM25.jpg|<center>#121:<br>Dwarf Lord at Noldorin Forge | ||
image:EagleM07.jpg|<center>#127:<br>Bilbo & Frodo at Rivendell | image:EagleM07.jpg|<center>#127:<br>Bilbo & Frodo at Rivendell | ||
| − | image: | + | image:EagleM134.jpg|<center>#134:<br>Pippin with the palantir |
| − | image: | + | image:EagleM141.jpg|<center>#141<br>Sam & Gollum at Mount Doom |
</gallery> | </gallery> | ||
<gallery> | <gallery> | ||
| − | image: | + | image:EagleM145.jpg|<center>#145:<br>Chess-playing Hobbit |
| − | image: | + | image:EagleM148.jpg|<center>#148:<br>Merry & Pippin |
| − | image: | + | image:EagleM151.jpg|<center>#151<br>Sam and Rosie |
| + | image:EagleM0153.jpg|<center>#153<br>Gimli | ||
| + | image:EagleM155.jpg|<center>#155:<br>Bilbo in the Misty Mountains | ||
| + | image:EagleM0157.jpg|<center>#157<br>Gollum | ||
| + | image:EagleM0153.jpg|<center>#<br> | ||
image:EagleM04.jpg|<center>Packaging example | image:EagleM04.jpg|<center>Packaging example | ||
</gallery> | </gallery> | ||
Revision as of 05:32, 11 February 2010
Eaglemoss International


"#5: Gimli at Balin's Tomb"

#9:
Gollum at Emyn Muil
#20:
Frodo & Sam at Rivendell
#34:
Merry & Pippin at Isengard
#48:
Bilbo at Hobbiton


#54:
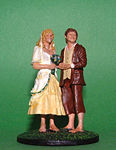
Sam & Rosie at Hobbiton
#57:
Smeagol at Gladden Fields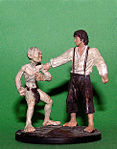
#60:
Frodo & Gollum at Mount Doom
#64:
Sam at Cirith Ungol
#74:
Pippin in the Mines of Moria
#82:
Frodo & Bilbo at the Grey Havens
#86:
Proudfoot at Hobbiton
#94:
Pippin with wounded Merry
#95:
Gollum in the Misty Mountains caves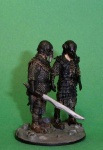
#98:
Frodo & Sam dressed as orcs
#103:
Gollum at Mount Doom
#104:
Gimli at Lothlorien


#121:
Dwarf Lord at Noldorin Forge
#127:
Bilbo & Frodo at Rivendell
#134:
Pippin with the palantir
#141
Sam & Gollum at Mount Doom


#145:
Chess-playing Hobbit
#148:
Merry & Pippin
#151
Sam and Rosie
#153
Gimli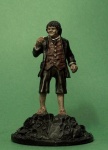
#155:
Bilbo in the Misty Mountains
#157
Gollum#

Packaging example


